Rabu, 29 Februari 2012

SWR AND POWER MODIFIED BRUENE BRIDGES by Dominique - F1FRV

This design is applicable for small or high powers, from 100 kHz (or less) to 50 Mhz, from miliwatts to kilowatts, depending on the selected components. For best results, use the ferrite "43" or "61" material. Materials "4C6 or 4C65" generaly painted in purple, are exactly identical to material "61" and can also be used. Material "2" iron powder painted in red, has been added in tables, but i do not recommand their use.
In theory, "61" or "4C6/4C65" could be used for 144 MHz, but i did not experimented ...
Good suppliers for toroids are: PartsAndKits and AMIDON ....
With good electrical and mechanical design, using parts described here, and PCB designed for, 1.8 to 30 (50) MHz directivity can be better than 35 dB, and accuracy in power measurements in the range 1 to 2 %. Not so bad, isn't it ...
With different electrical or mechanical design, or misunderstanding of the excel sheet, please, do not complain if you obtain bad results, no or poor directivity, or transform resistor and wires into smoke and flammes.
EXCEL sheet design example
Nota: It is better to select the schematic with one resistor R2 and mid tap at coil, than the other scheme with 2 half values resistors. As it is easier to have EXACTLY the same nb ot turns in coil, than having EXACTLY the same values of the 2 resistors. Any difference in the 2 resistors values would give errors in SWR measurements results.
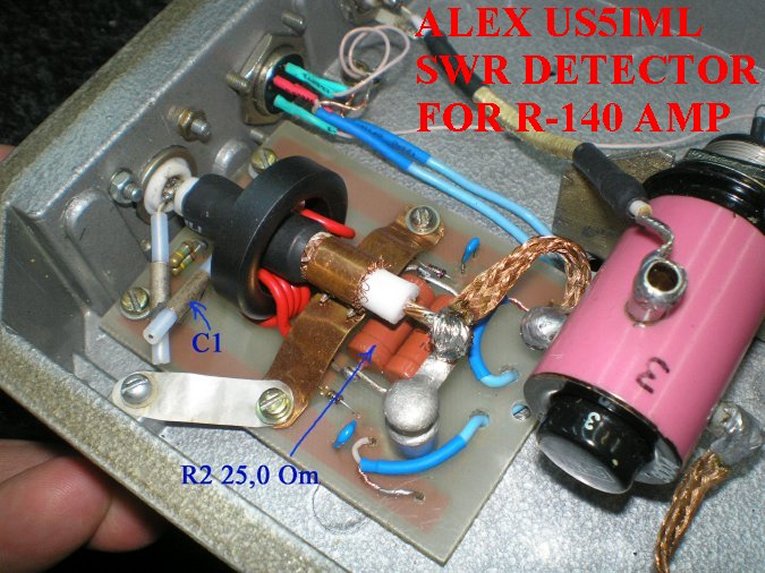
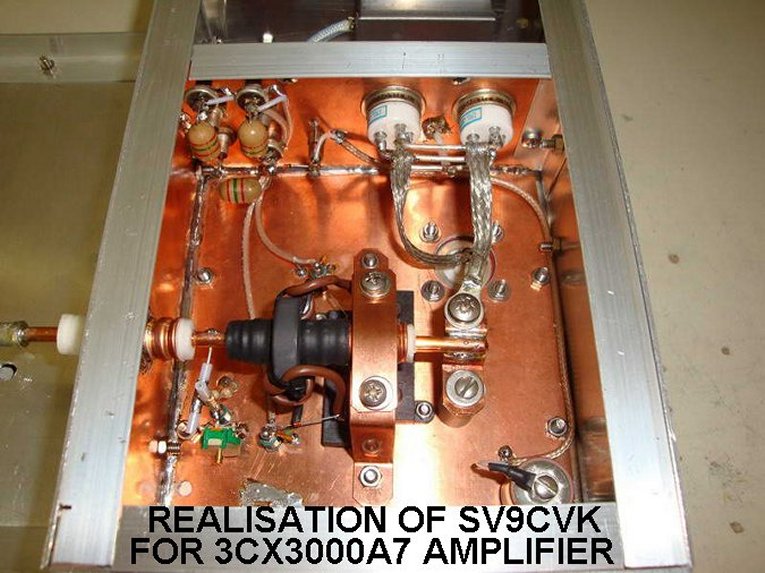
Place the WIDE ground return strip(s), not a single wire, between coaxial line, circuit board and main ground frame, as close as possible to the toroid, to have the best accuracy in POWER measurements over a wide range of frequencies. For SWR measurements ONLY, this is not important, as the ratio FWD/REF is independant of absolute values of detected voltages.
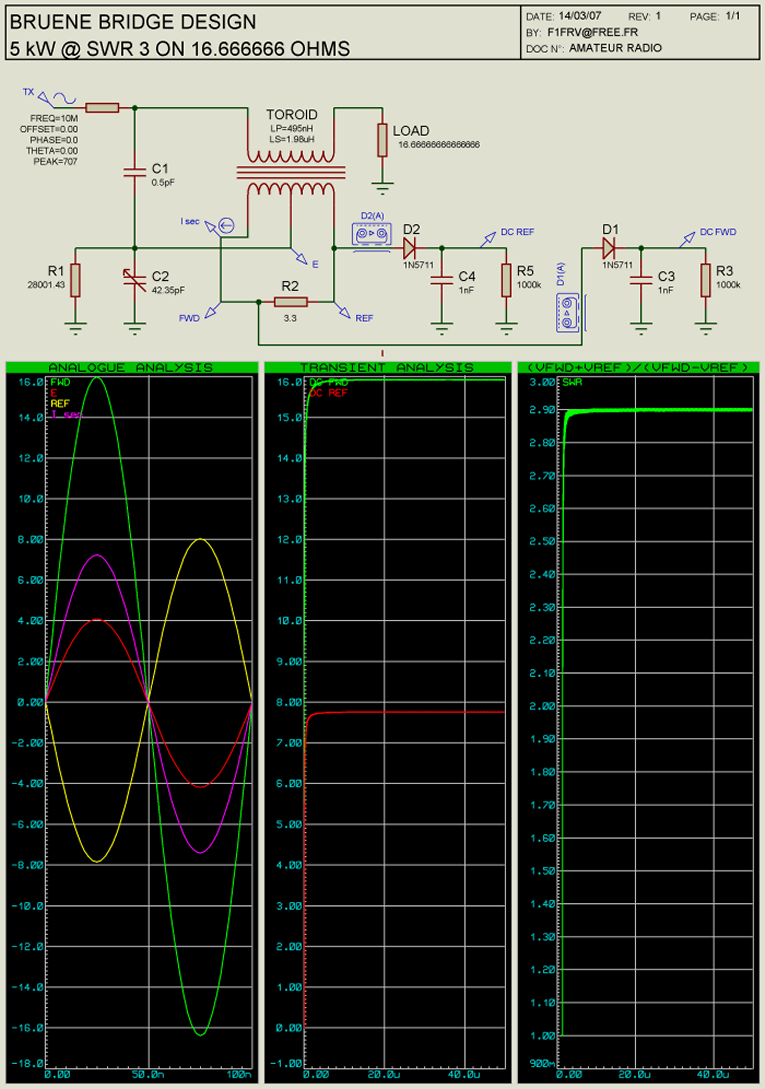
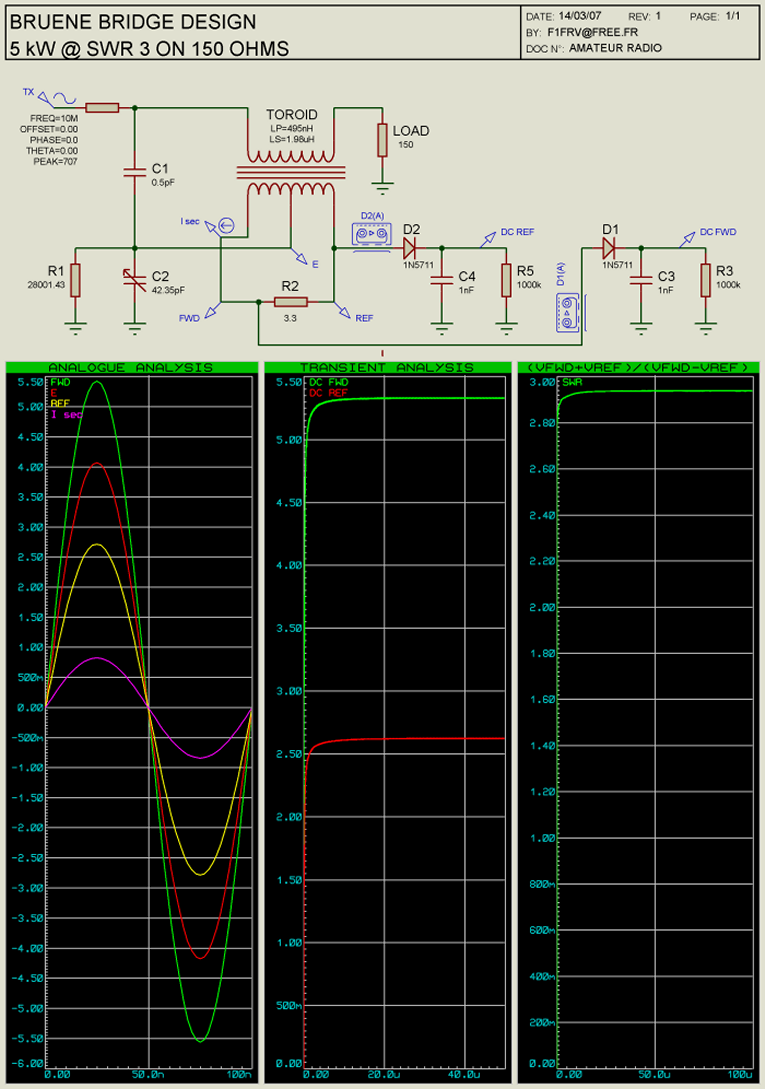
To have perfect balance of the bridge, with the calculated values given by EXCEL sheet, it is important to know the " TRUE " values of the coil(s), resistor R2, and capacitor C1. To know what is the exact Al value of your toroid, coil 5 turns of wire into it, measure with a LC meter, and divide value by 25. A variable C2 capacitor, as shown, is MANDATORY, to compensate for all tolerances in components values, parasitics. During tests, dont hesitate to modify calculated value of C2 (fixed + adjustable value) to obtain the best balance.Tolerances and parasitics management is not an exact science.
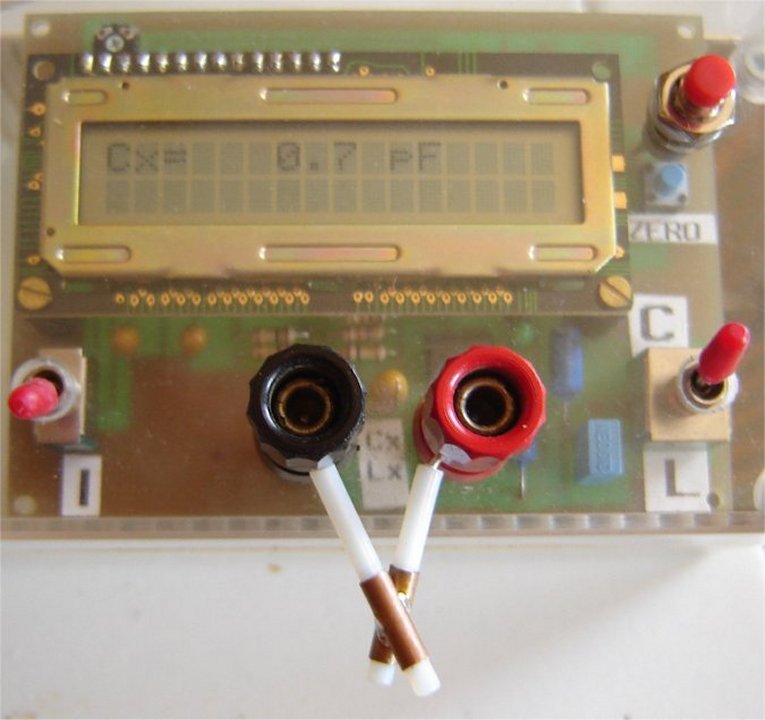
Check of coil(s) and capacitor C1 exact values can be made with a LC meter, like the one described in pages " Technical " and proposed by DF1SR (ex DD0SB).
Adapt cross sectional area of wires in toroid to maximum current in R2, do not undersize, 3 Amps by square milimeter is a maximum.
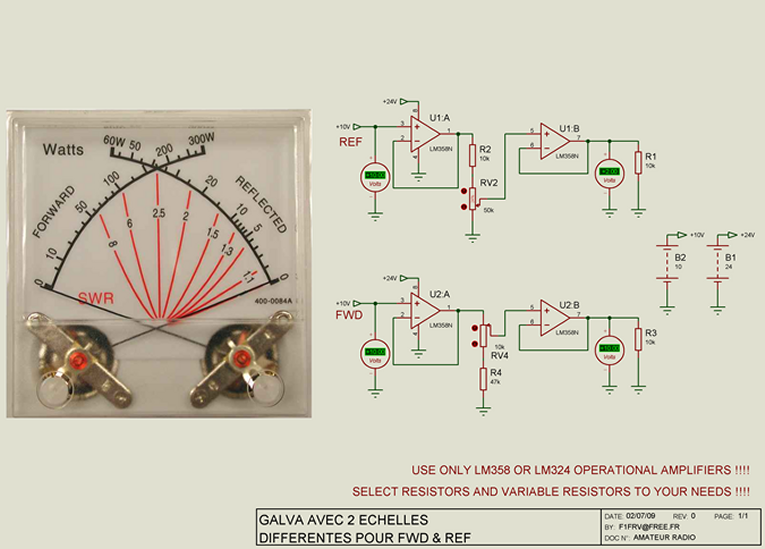
Load on detector diodes is a first order parametre for rectified voltages output. Do not hesitate to use operational amplifiers LM358 or LM324 as buffers (they include GND in common mode range). In this case, with very high impedance detectors load, to avoid too high time constant in SWR readings, reduce, if necessary, the values of decoupling capacitors in FWD & REF outputs (10 nF is OK with operational amplifiers, 100 nF or more without operational amplifiers).
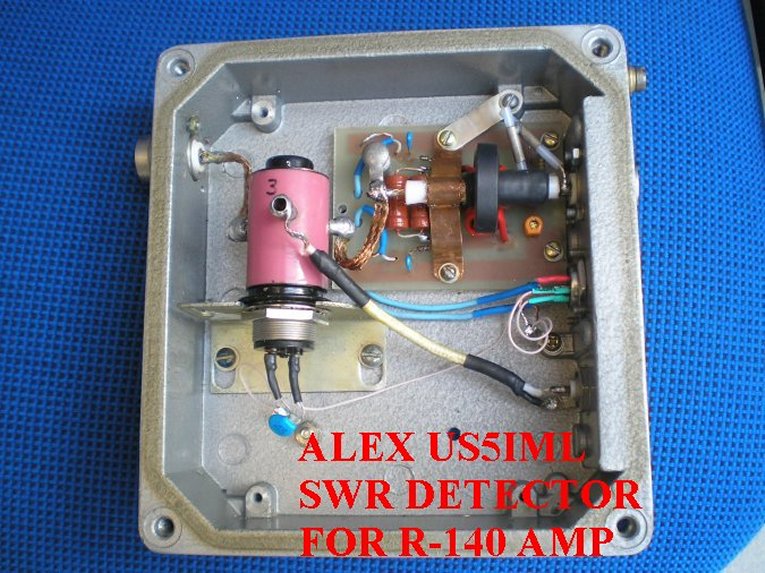
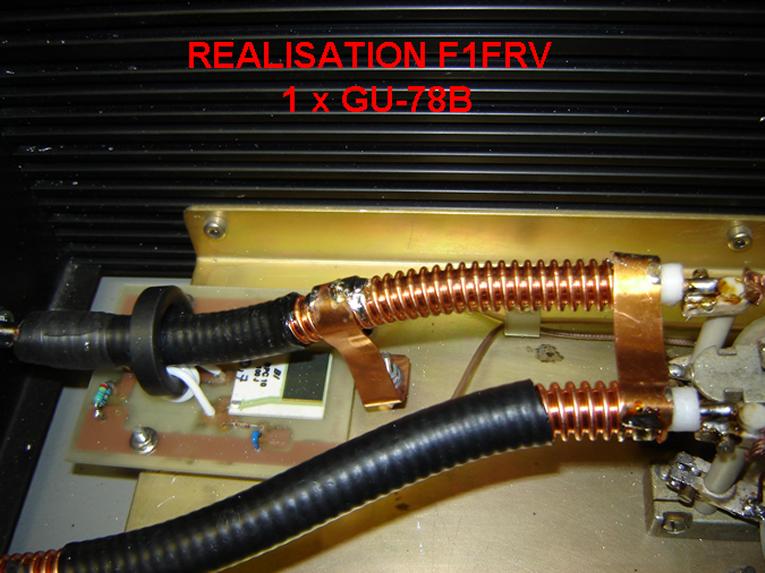
Note the wide ground strap (12 x 0.5 mm) behind toroid
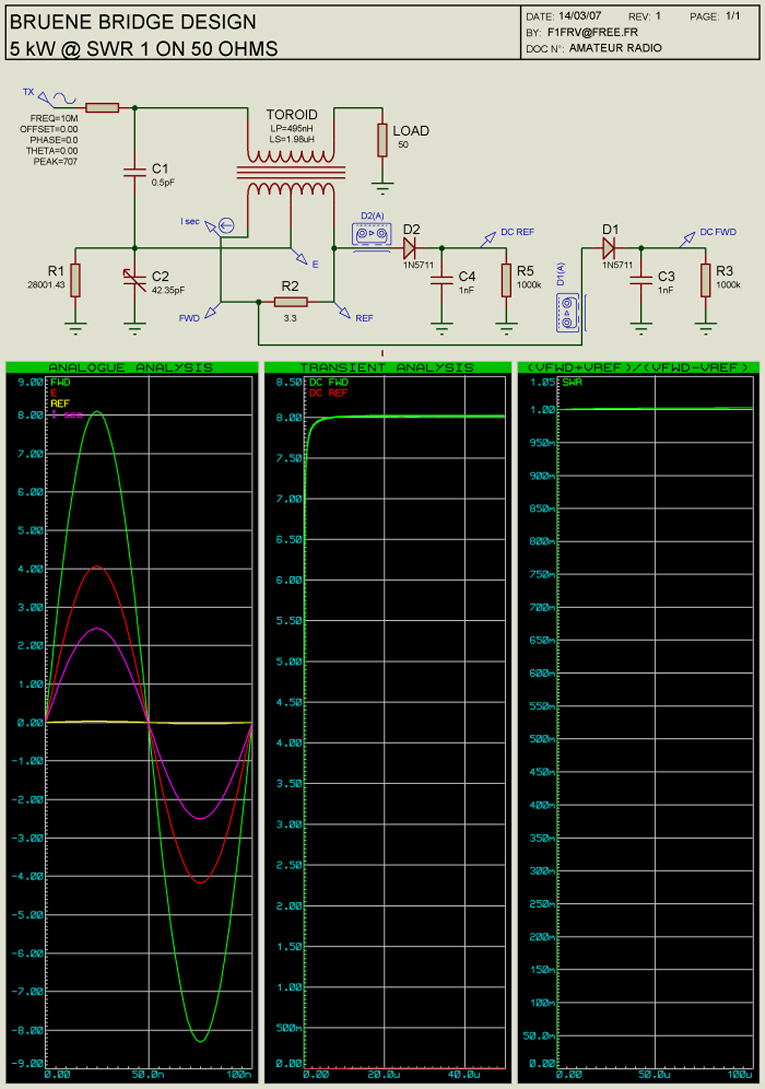
Simulations of the bridge phase & balance
 
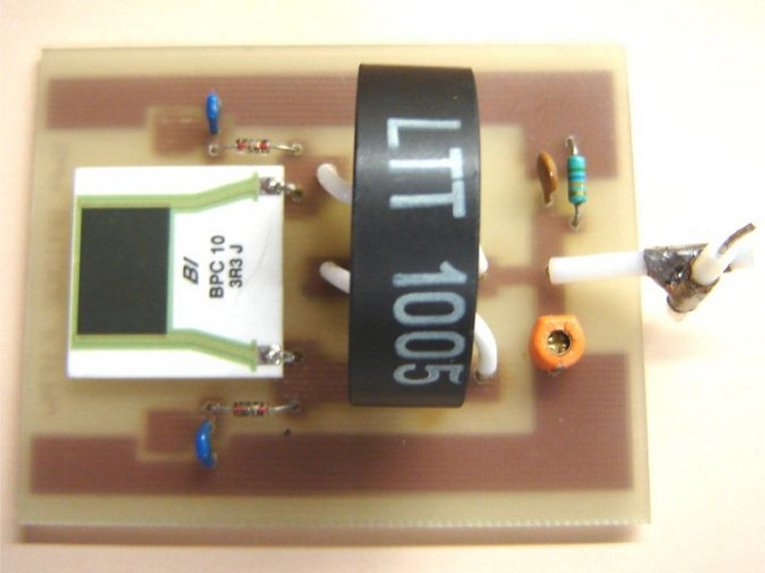
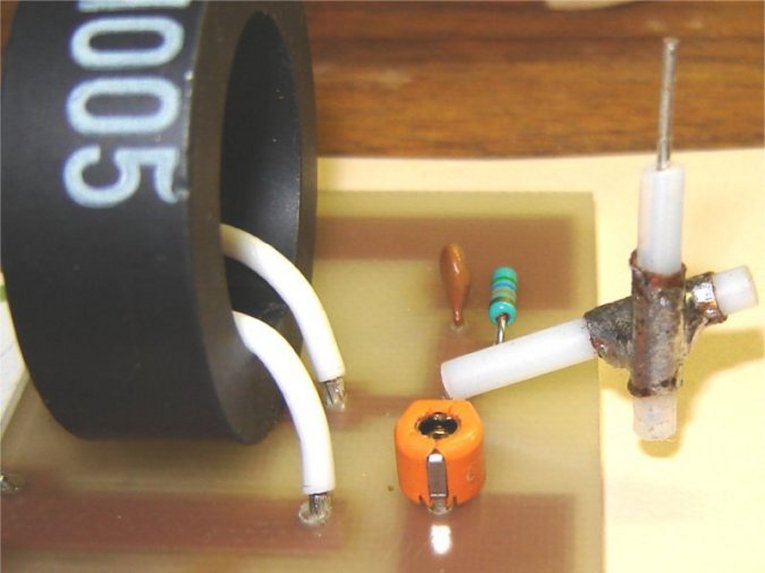
Bridge old revision 3 PCB & components picture
Detail of the 0.5 pF @ 4000 V capacitor ( 2 x 10 mm of copper of RG402 )
Measurement of a 0.7 pF @ 4000 V capacitor ( 2 x 14 mm of copper of RG402 )
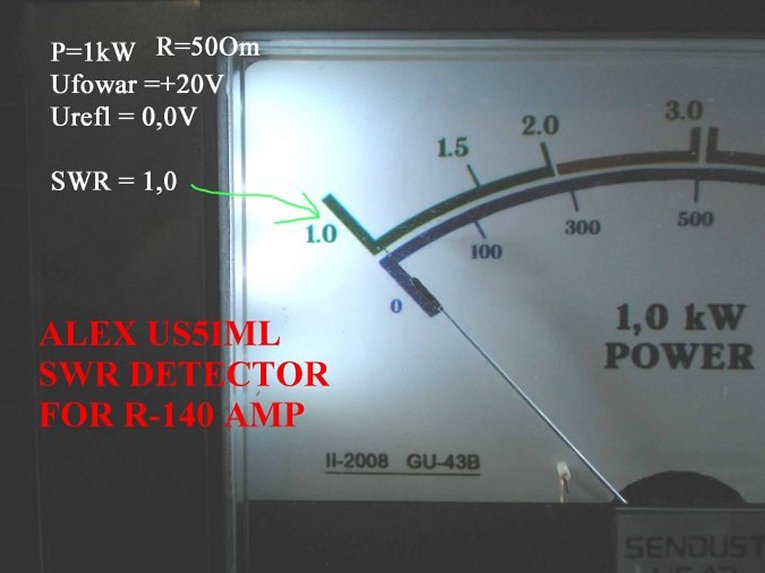
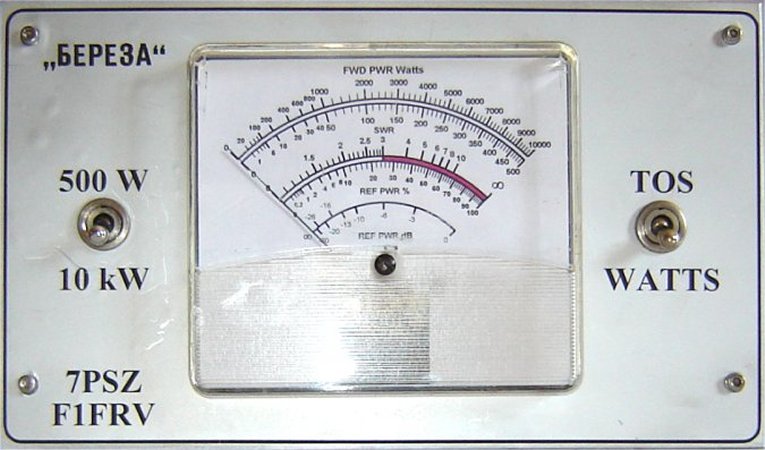
Front plate with meter
HENTENNA (144 Mhz)

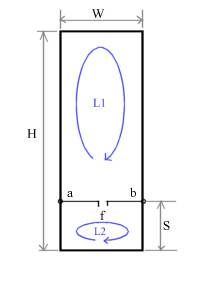
Quest'antenna che rientra nella categoria delle "loop" è stata inventata e sviluppata attorno agli anni '70 da un gruppo di tre radioamatori giapponesi (JE1DEU-JH1FCZ-JH1YST) e prende il nome di "HENTENNA" in quanto "HEN" in giapponese significa "STRANO" come strane sono le sue caratteristiche che vi illustrerò fra poco. Estremamente facile da costruire,può essere realizzata sia con filo di rame (la si può quindi riavvolgere,riducendo al minimo l'ingombro) che con tubi/piattina di alluminio (estrema leggerezza),presenta le seguenti caratteristiche :

  • BASSO ANGOLO DI IRRADIAZIONE
  • BUON GUADAGNO ATTORNO AI 3/3,5 dbD PARI AD UNA YAGI A 2-3 ELEMENTI
  • BUONA LARGHEZZA DI BANDA (CIRCA 1,5 MHZ)
  • ROS MOLTO FACILE DA REGOLARE
  • IRRADIA IN ENTRAMBE LE POLARIZZAZIONI (il loop superiore lavora in polarizzazione orizzontale,mentre quello inferiore in verticale)
  • INGOMBRO MINIMO

 
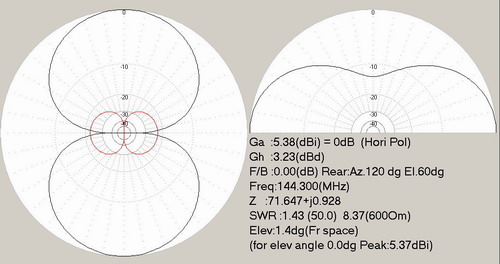
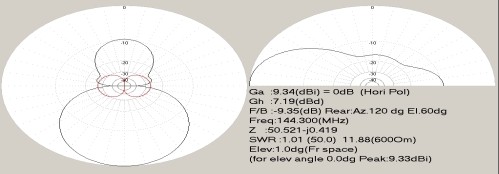
 Diagramma di irradiazione delle due polarizzazioni . (nero= pol. orizz / rosso=pol. vert)

Passiamo ora alla sua realizzazione pratica :


20mt
17mt
15mt
12mt
10mt
6mt
2mt
70 cm
Freq. (Mhz) :
14,20
18,15
21,25
24,95
28,50
50,20
144,3
432.2
Lungh. d'onda : λ (mt)
21,13
16,53
14,12
12,02
10,53
5,976
2,080
0,694
Altezza :  H (mt)
10,56
8,26
7,06
6,01
5,26
3,00
1,04
0,347
Larghezza : W (mt)
3,52
2,75
2,35
2,00
1,75
1,00
0,35
0,12
Distanza del separatore dal Loop :  S (mt)
2,11
1,65
1,41
1,20
1,05
0,60
0,21
0,07


W= λ/6   H=λ/2   S=λ/10  e nel nostro caso,considerando come frequenza di centro banda gli ormai noti 144,300 Mhz, avremo :
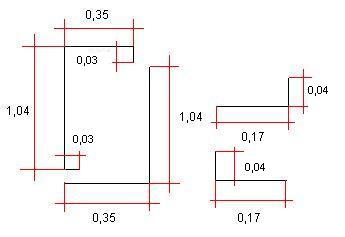
W=35 cm  H=1,04 mt ed  S=21 cm (in realtà, da svariate prove effettuate durante la fase di taratura,quest'ultimo valore si attesterà attorno ai 26 cm , λ/8)
considerando λ=(300000/144300)=2,08 mt
NB : Queste formule sono ovviamente applicabili per qualsiasi frequenza compresa dalle HF alle UHF,come si nota dalla tabella.


ELENCO MATERIALE OCCORRENTE :
  • 3,18 MT DI FILO DI RAME DA 2 MM2  (in alternativa,si può utilizzare il conduttore centrale dell'RG 213,la struttura però non riuscirà ad autosostenersi e bisognerà appenderla come ho fatto io)
  • N°3 MAMMUTH SINGOLI
  • N°1 MAMMUTH DOPPIO
  • N°1 SO-239 O PL-259


ASSEMBLAGGIO :
  • Prendere uno spezzone di rame lungo 2,78 mt e inserire i 3 mammuth singoli,quindi sagomare il tutto creando la forma del rettangolo esterno (104*35 cm) ,chiudendolo alla base con uno di essi.
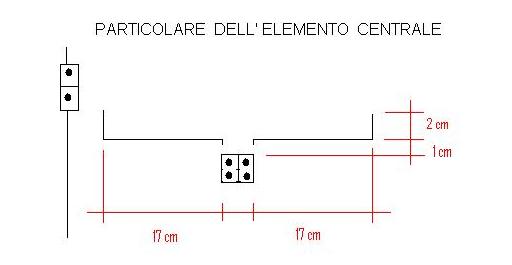
  • Collegare al mammuth doppio,da un lato l'SO-239 (oppure il PL-259) e dall'altra le due sbarrette da (2+17+1) cm,inserendo le estremità libere di quest'ultime nei due mammuth singoli, non ancora serrati.
  • Posizionare il dipolo centrale ad un'altezza dalla base pari a circa 28 cm e stringere tutti i morsetti.
  • Verificare infine il ROS, che comunque dovrebbe risultare ottimale e costante per tutta la banda 144-146 Mhz.In caso contrario,agire sulla distanza S,tenendo conto che se S1>S,andremo su in frequenza,altrimenti se S1<S,scenderemo di frequenza.Per facilitare ulteriormente l'accordatura, cercate di utilizzare un conduttore avente sezione piuttosto larga,e non per intenderci del filo in rame da 1 mm2 (normalmente vanno bene valori superiori ai 2 mm2).


Per finire,eccovi alcune foto illustrative su quanto appena spiegato :


Foto 1 (Fissaggio ad una tapparella)


Foto 2


Foto 3


Foto 4


 Foto 5


Foto 6 (Fissaggio su di un palo in PVC)


Foto 7 (Versione con piattina in alluminio)


Foto 8


Foto 9


CONCLUSIONI :
Dalle prove effettuate non posso che parlare bene di quest'antenna,basti pensare che con quella in alluminio,posizionandola ad 1 m sopra il tetto (12 mt da terra),e soli 0,5 Watt di potenza,sono riuscito a collegare IK4WKU/4,per un QRB di 182 Km e segnale S3.Chiaramente Marco,essendo in quota e con una direttiva non ha fatto fatica a ricevermi,ciò nonostante a mio avviso è stata una buona prova d'esordio.Ancora meglio è andata nel TROFEO ARI CITTA' DI TREVISO (vedi LOG),svoltosi nei giorni 03-04/07/2004,dove questa volta, con 10 Watt ho collegato facilmente Piemonte,Corsica,Austria,Slovenia,Croazia e,grazie ad un'apertura in E Sporadico,perfino la Repubblica Ceca (OL2R - QRB 548 Km),con un QRB medio attorno ai 180-200 Km.(in ogni caso,decisamente meglio rispetto a quello ottenuto con la Halo).Per ulteriori informazioni,consiglio come sempre l'ottimo sito di Claudio IW2KWC (guardate sui LINKS) dove troverete spiegazioni dettagliate.Un'ultima cosa,per chi volesse realizzare un prototipo con la piattina in alluminio,consiglio di acquistare n°2 sbarrette da 2 m del tipo 15*2 mm.Le dimensioni non sono critiche,basta solo rispettare i valori ottenuti dalle formule senza esagerare nella tolleranza : nel mio caso,il rettangolo principale l'ho realizzato unendo fra loro con quattro viti ,(due per lato),due "L" lunghe rispettivamente 139 cm e 3+139+3=145 cm (3 cm per parte in aggiunta per creare il sostegno e su cui effettuare i due fori).Per quanto riguarda il dipolo centrale posizionato a 26 cm dal lato inferiore,(n°2 "L" lunghe 4+17=21 cm),consiglio di fissarlo lateralmente con due viti sui lati lunghi 4 cm.


 Come si può vedere (foto 7,8,9), ho utilizzato inoltre,una scatola elettrica in plastica rettangolare con al centro il connettore SO-239 ed ho fissato una staffetta per agganciare il tutto ad un palo.


Foto 10
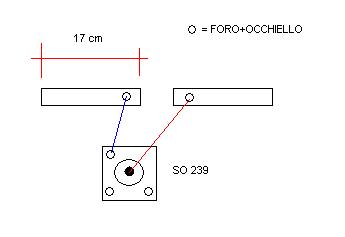
Per collegare il connettore alle due braccia del dipolo infine,mi sono servito di due spezzoni da 2 cm di comunissimo filo elettrico ,intestandoli con tre occhielli alle estremità,due dei quali andranno avvitati sulle sbarrette da 17 cm preventivamente forate,il terzo alla massa del connettore,e l'estremità libera saldata direttamente al centrale dell'SO-239.


 Se qualcuno volesse provare a "spremere" qualche dbD in più all'Hentenna, consiglio di provare la seguente modifica suggeritami da Claudio IW2KWC,e cioè di inserire parallelamente ai lati corti e ad una distanza pari a circa 1/4 λ,due riflettori lunghi ciascuno λ/2.In questo modo,il guadagno complessivo dovrebbe passare dai 3 dbD ad un valore prossimo ai 6 dbD...unico neo la perdita della direttività nelle due direzioni,visto che così com'è si comporterà come una YAGI (da cui il nome YAGHENNA o HENGI).Con quest'antenna nella versione per i 70 cm sono riuscito a realizzare un QRB di 405 Km (IQ1KW).


Foto 11 (Hentenna per i 70 cm)


G3TXQ Hex Beam For 5-Bands Built By WY3A


The G3TXQ Hex beam performs beyond my expectations.

In early 2008, I constructed a 5-band G3TXQ Broadband Hex Beam carefully following the K4KIO building instructions.  I wanted something lightweight to cover 5 bands, something that would handle power, something less expensive and less complicated than the 2 element Stepp-IR.  The Hexbeam intrigued me enough to subscribe to the HexBeam Group where I learned that the design has many satisfied buyers and homebrew builders.


The wires in the classic HexBeam attach to a light-weight fiberglass "upside-down umbrella" frame (see photo to the left) with the following geometry for each band:
 Classic HexBeam Geometry
In multiband versions, 20M elements sit at the top of the structure with 17M, 15M, 12M and 10M stacked below.  Fed with single run of coax, you end up with separate 2 Element Yagis on each band with useful gain and excellent F/B. 
However, the classic HexBeam is a bit narrow, displaying SWR > 2 across major portions of most bands, when tuned for best directivity.


The G3TXQ Broadband Innovation
In the autumn of 2007 G3TXQ (Steve Hunt) conducted reflector experiments in an attempt to broad-band the hexbeam.  An exciting hybrid scheme emerged which modeled and tested very well.  The driven elements were kept in the classic "W" or "M" shape.  However, the reflector was run around the fiberglass support structure to form a large "C" or "U".  This keeps the reflector as far away from the center post as possible.  It also makes the antenna about 15% bigger than the classic HexBeam. 
G3TXQ Hex Beam Geometry

When incorporated into a 5-Band array, this geometry produces F/B > 10dB and SWR < 2:1 across all of the 20m, 17m, 15m and 12m bands, and approximately 1 MHz of 10m.   That is a fairly dramatic improvement over the classic Hexbeam.  This design caught my attention, but I wasn't sure I knew how to actually build the antenna.

Working closely with G3TXQ, K4KIO (Leo Shoemaker) made his own G3TXQ Hex and provided detailed building instructions on his site to help those interested in home brewing the new design affordably.  (Update: QST published this design in March 2009 and K4KIO now offers a commercial Broadband Hex Beam kit.)
Making and Assembling the G3TXQ Hex Beam
With K4KIO's fully illustrated pages, I had a virtual Complete Idiot's Guide to building the antenna, and no more excuses for not getting started.  I began buying and ordering stuff using Leo's Parts-needed list, which even tells you which vendors carry the products.  Fiberglass tubes for the spreaders and center post were ordered from Max-Gain Systems.  I fabricated my own base plate per Leo's plans, which was a little intimidating for a guy who is more comfortable with a keyboard or a soldering iron than a reciprocating saw.  But in the end, it was no problem, even for me.  The majority of the work was done at a leisurely pace, indoors, during the winter months. 
Assembly was not difficult when the warm weather arrived (see construction & assembly photos below).  Once assembled, no tuning was required as the SWR looked good on all bands with the base at only 4 feet.  The antenna is a near perfect match to 50 ohm coax on all bands. I now have the base at 50 feet on an AB-577 surplus military mast (see comments on the mast below).  This height is a good compromise for signals arriving at various angles (See Hex Beam Height arrival angle studies by G3TXQ).
Performance has been simply outstanding.  I know what to expect from a directive array as I have owned and used 3 element trapped triband yagi antennas before. To say that this beam performs beyond my expectations, would be an understatement. 
 
Construction Photos

The K4KIO design has undergone revisions since I built this antenna. 
K4KIO now recommends two floor flanges instead of one -- a very important improvement.
You can also buy a
commercial K4KIO Hexbeam
which features a coaxial aluminum center post
requiring no wiring harness at all
(very cool).
 
Homemade Baseplate with U-Bolts and Floor Flange
Painting the Spreaders and Connector Blocks
I like the light blue gray paint color I chose here. 
The antenna is less visible against the sky on most days
Base, Spreaders, Wires, Spacers Coax Feeders
20 Meter Wires Installed
Wires for Other Bands Installed
Base and Center Post Detail
Dacron / Kevlar Spacers Between Driven Elements and Reflectors
G3TXQ Broadband Hex and Rotor On AB-577 Launcher
I used an old ALLIANCE  U-100 Rotor which will handle 5 sq. ft of wind load
CHEAP AND NO PROBLEMS AFTER 3 YEARS of use
Homebrew G3TXQ Broadband Hex Beam (Base at 50 feet)